GOTO considered harmfuls

It weren’t like that when I were a lad…but supposedly it makes things easier. These new auto-slewing mounts, with keypads programmed with a bazillion and one objects. All your deep sky objects, all your doubles, all your clusters, all your planets, all your everything, even no doubt things beyond the limit of the scope you are using.

No matter, I have one, and thought I’d try it. I can follow instructions, I am not a total technophobe, I always made sure the clock on my VCR was correct. And I know my way (ish) around the sky, this whole ‘two star alignment’, sure I can find the stars they want. So power it up and away we go. Well, not quite. First off, polar align it. Luckily, I know where Polaris is, and that is close enough to give me within a degree of the actual pole. I also know my latitude, again I can push the scope into position of that. Drag the mount down on to the patio, lined up, and let’s try and do the star alignment.

(Bear in mind this is the first time I did this, the second time went swimmingly. But I had read the instructions a bit closer before then. At this point, I had them in my hand, had read them and was now trying it.)

Turn on. Press a few ENTERs to get along a bit, ok. Right. Time. Check. Date. Check…wait, it said it was going to ask me my lat/long, or I could select my city. Nope. Ah well, battle on, it must know best. Right so. Choose a star to slew the scope to. Wait…I don’t recognise that one…hmm..southern hemisphere? That is a bit odd. Scroll throw..dammit, the direction buttons aren’t the scroll-through-menu buttons, the scope now moved, try again. Nope, not recognising any of these stars. Why is it offering me bits in the southern hemisphere? Eh? Read more. Dammit, where are those menu options. This makes NO SENSE. Read again. LESS SENSE.

(A slight break: the only intuitive interface is the nipple, everything else is learned. Anyone who says their interface is intuitive is lying. What they mean is they have gotten used to it by experience, and can’t remember what it was like to stumble through. Back to the post…)

One more read. More presses and clicks. Nothing. Nothing at all. So I gave up, did everything manually again.

The next (clear) night, I decided to try again. I read a few words I missed last time. When setting up, sure why not click back a few times at a certain point, *then* you can enter you lat/long, as that makes sense, that is a good way to get to it. Anyhow. Hoo-rah. Job done. Now go for the star alignment, hoping for the best…yup, stars I recognise, and can slew to. Excellent.

Of course, I still never really made much use of it (there is a star tour mode, the Messier/NGC/more catalogues) as I was tootling around in Gemini. But still, seems like it might be useful, if even just to save me from pushing the scope around when I want to hunt elsewhere.

But damn it isn’t a good interface. I still keep pushing the slew arrow the odd time in menu selections. Granted, the menu scroll selection buttons feel a bit different, I get I just have to get used to it. Then it will be intuitive.

Or I am just getting old, out of touch and tech is leaving me behind.
Double trouble

Time outside: 21:45 – 23:10

Alignment process: 2-star (and seemingly successful, post about alignment woes still in the pipeline)

Conditions: After cloudy all day, even up to 21:00, I wasn’t anticipating any observing. But while in the kitchen making…well, I forgot about making the coffee as I looked outside, and it was clear. Quick! To the astroshed! Get those optics outside and start cooling down!

What I observed:

1. Jupiter. Have to, really. My sketch (yes, really) shows two easily visible bands, and four moons, two either side

2. 38-Geminorum – twins in the Twins. A fine pairing, even if just to test the resolving power of the telescope.

3. zeta Geminorum – not really straying too far around the sky here, but this is a Cepheid, so I’ll keep an eye on it.

4. Castor/Pollox, just as they were close

Other:

I also tried my old camera for some pictures, but as it doesn’t have a ‘live view’, too ancient for that, nothing focused. So rather than steal my daughter’s camera, I decided I’d stick with visual observing and not waste any more time faffing. Speaking of daughter, she was out for a bit too, ooh-ing over Jupiter, and being impressed with doubles.

Summary:

All in all, not a bad time. I have no great desire to go swinging from one side of the sky to the other, I am happy to hunt around in the same area, getting to know the inhabitants.

Tools of the trade

For as long as I can remember, the eight inch Schmidt-Cassegrain has been the stalwart of amateur astronomy. A good all-rounder, decent aperture, and not needing a behemoth mount like the similar and larger Newtonians. Those mounts are beasts. Seriously. So that is the most sensible choice within budget. Yes, it is more expensive than a similarly sized Newtonian (by, err, about a grand!) but I think it the better choice.

So down I tottled to Tring Astro for a nice chat and parting of cash. Fine fellows down there, I do recommend them.

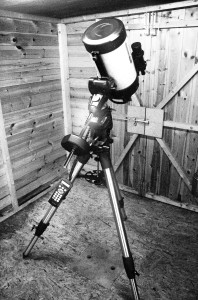
My SCT

She is, as yet, unnamed.

And that is what I returned with. The Celestron VX8. A lovely thing. Of course, the standard lense that comes with it is fine, but I needed another one. And, as you all know I do love my photography, I needed a T-adapter and T-ring. Which I didn’t buy there and then, but a few days later, again from Tring Astro, this time via mail-order. Or online, whatever The Kids call it these days. And it arrived in a day. Go them! Seriously, go see them if you want kit.


Bits and bobs

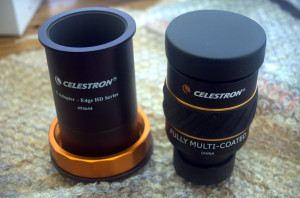
T-ring and 12mm lens

With the T-adaptor and ring, I can start on my astrophotography journey, too.(I might also write up about how I made these images using open source satellite data, given I have lectured about it, and having such a post in this weblog would make sense.)

When I first got set up, it happened to be clear, so I did some tests of the optics, using Jupiter mostly. Gosh and crikey. It never fails to amaze me when I gaze into the heavens. And it was good. The following night was a bit more frustrating, as I tried to set up the GOTO mount functions, and it drove me mad. That will be the next post.

The journey to this point

Everyone looks up at the stars when they are young, and wonders. But this isn’t a philosophical post, this is an introduction. This weblog is about my journey from buying a new telescope, for both optical and photographical purposes, to what I do and what I see. More than an observational log, though that is what it was going to be originally. It will be my frustrations and triumphs, bits I buy, change, amend, and hopefully soon pictures of what I can see and longer exposure of things I can’t.

I probably should say something about my background. I was fist given a (tube! like a pirate captain’s variant) telescope when I was about five, it was a heavy metal tube, not totally a child’s toy. The optics were acceptable, I could see the craters on the moon (and cows at the other end of the field). Not much more than that. A few years later, my mother bought me a 3″ reflector, on a wooden tripod, with which I could resolve double stars, and see the shadows of the mountains on the moon. I still have it. But over the years, the mirror lost its silver, and the tripod got rickety, and it kind of lost its will to live. I mean, it was old when I got it, and we are talking over three decades on.

My love of the stars never left, and I studied further at college, and used their huge scope in the observatory. I remember taking the young lady I was courting up there, and showing her Andromeda, a glorious sight in a huge scope. (That young lady I was courting is now my wife, mother to my children and doing an astronomy GCSE! While I would be an astrophysicist, she is a physicist.)

So I’ll record what goes on here, the next post being a list of the equipment I am starting with. With photos! And specifications! But no costs. This *is* an expensive hobby. But like all things I buy, it will last for a long, long time. I get the use out of my purchases.